When I’m asked how to capture a tight, intimate jazz kit using only one overhead and one snare mic, my immediate reaction is: you can get a remarkably musical result if you focus on placement, mic choice, and how the kit is prepared. This is a go-to approach for small clubs, quick session setups, or when you want a focused, vintage-sounding drum capture without a complicated mic array. Below I share the workflow I actually use in the studio and on low-fi gigs — the practical decisions, the common problems, and the quick fixes that make this technique sing.
Why one overhead + one snare?
Using a single overhead plus a dedicated snare mic keeps things simple and musical. The overhead captures cymbals, the overall kit balance and the spatial cue, while the snare mic gives you attack and definition in the mix. With careful placement and some basic processing, you can create a tight, punchy sound that's well-suited to small ensemble jazz where dynamics and nuance are everything.
Gear I reach for
- Overhead mic: A small-diaphragm condenser like the Royer SF-12 or a pencil condenser such as the Neumann KM 184 or AKG C451. If you want more warmth and presence, a matched pair isn't necessary here — one well-chosen pencil condenser works.
- Snare mic: A dynamic with good snap — the classic Shure SM57 is a reliable choice. For a bit more presence and transient detail, try the Sennheiser MD 421 or a small-diaphragm condenser if the room and bleed allow.
- Preamps: Clean with a little character. I like the Neve 1073-style pre for snare if I want body, or modestly colored units like the API 512c for upper mid punch.
Preparing the kit and the room
Before any mic goes up, spend time on: tuning, damping, and cymbal selection. A tight jazz kit is usually higher-tuned with controlled resonance. I’ll put a bit of felt under the snare batter or use low-mass dampers on the toms. If the hi-hat is too splashy, switch to a thinner top hat or use lighter sticks. These small choices reduce the need for surgical EQ later.
Room matters. Ideally you’re in a small to medium room with a nice natural reverb — not a cavernous hall. If the room is too live, add absorbers behind the drummer and off-axis to the overhead to tame reflections. Don’t over-dead the space; a little air and decay make jazz breathe.
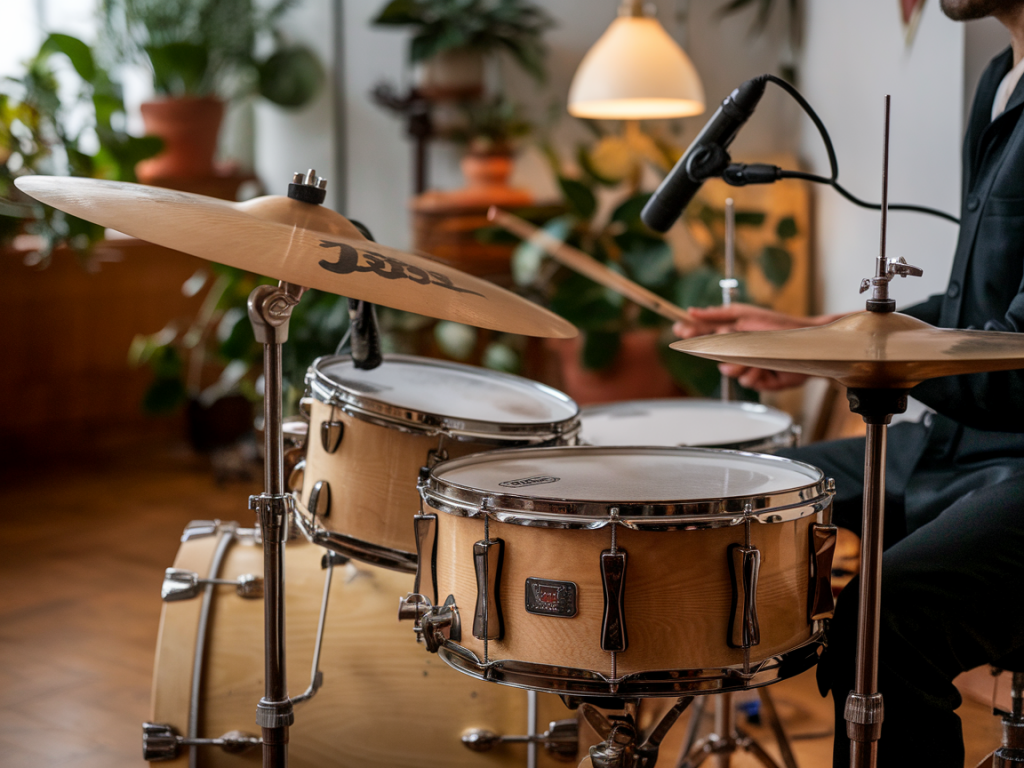
Placement — the core of the technique
- Overhead position: I place the overhead about 2–3 feet above the kit, centred roughly over the snare or slightly towards the ride depending on the pattern. Aim for a stereo-compatible position where the ride and cymbals are clear and the toms & snare sit in a pleasing balance. For a tighter sound move the overhead closer (1–1.5 ft) — this increases direct sound versus room and reduces bleed from other instruments.
- Snare mic placement: Start with the snare mic 2–3 inches above the rim, angled toward the center of the batter head, and about 1–2 inches inward from the edge to catch stick attack without too much ring. If the snare is overly brittle, pull back and angle towards the shell to capture more body.
Phase and listening tests
Phase is critical when working with only two mics. With both mics live, solo the snare and the overhead and flip the snare polarity — listen for which position gives the nicest combination of attack and body. You want the snare to retain transient snap without sounding thin due to cancellation. Move the snare mic slightly if flipping polarity doesn’t solve it — sometimes microscopic distance changes shift phase alignment more usefully.
Dealing with bleed
Bleed is part of the charm for jazz, but too much can muddy the low end or bring unwanted kit noise. My strategies:
- Raise the overhead close enough to increase directivity and reduce spill from bass or room noise.
- Use a cardioid snare mic aimed to minimize kick pickup. If the kick pokes through, a simple foam kick screen or a bit more damping on the kick can help.
- Mic the snare closer for more gain-before-feedback; this lets you lower preamp gain and reduce overall bleed.
EQ and dynamics — simple, musical moves
In the box, I take a conservative approach. Start with these general moves and trust your ears:
- Snare channel: High-pass at 80–100 Hz to clear stage rumble. Add a gentle boost around 3–6 kHz for stick presence if needed. If the snare feels boomy, narrow cut at the offending frequency (often ~300–500 Hz).
- Overhead: High-pass around 120 Hz to remove low-end build-up from kick and room. Add a gentle shelf or boost above 8–10 kHz for air, but be cautious — too much can make cymbals harsh.
- Complementary EQ: If the overhead is dull, a subtle boost at 5–7 kHz can bring back ride clarity without overaccenting hi-hat.
- Compression: Light compression on the snare (2:1, slow attack, medium release) can glue the hit without squashing dynamics. On the overhead, I usually avoid compression unless I want to control peaks across the kit. A slow, gentle bus compressor on the drum mix can tastefully glue both sources together.
Advanced tricks I use
- Parallel compression: Send snare and overhead to a bus with heavy compression (10:1 or more) and blend a little back under the clean signal to add sustain and snap.
- Transient shaping: If the snare needs extra click, use a transient designer to emphasize attack. Conversely, soften attack slightly if it’s too aggressive in a small ensemble.
- Stereo width: Since you only have one overhead, I’ll sometimes duplicate the overhead, high-pass and slightly EQ each copy differently, pan them subtly and add tiny delays (<15ms) to create perceived width without phasing problems.
- Automation: Jazz lives in dynamics. Automate snare level to follow musical phrasing rather than compressing everything into the same volume.
Troubleshooting common problems
- Cymbals too harsh: Lower overhead or move slightly over the ride; roll off high frequencies above 12–14 kHz or use de-essing if necessary.
- Kick bleeding into snare: Change snare mic angle, increase distance from the kick, or add low-end attenuation below 60–80 Hz on the snare channel.
- Snare lacks body: Move snare mic slightly back to capture more shell resonance, or add a subtle mid boost around 200–400 Hz.
- Room sounds boxy: Add absorbent panels at first reflection points, or move the overhead slightly to reduce direct reflection capture.
Reference checks and final tips
Always A/B your sound against reference tracks — classic ECM or Blue Note small-group recordings are great targets for tight jazz tone. Also, check the kit in context with the rest of the band and run a short take to verify how the snare and overhead sit with double bass and piano.
Finally, remember that simplicity can be powerful. With the right mic choice, thoughtful placement, and a few tasteful processing moves, one overhead and one snare mic will often give you the clarity, warmth, and dynamics you want for a tight jazz session. Be patient, make small moves, and trust your ears — a little time spent tuning and listening will save you hours in the mix.
| Element | Quick Setting |
|---|---|
| Overhead height | 1–3 ft above kit (closer = tighter) |
| Snare mic distance | 2–3 in above rim, angled to center |
| Snare EQ start | HPF 80–100 Hz, +3–5 dB at 3–6 kHz (if needed) |
| Overhead EQ start | HPF 120 Hz, gentle presence boost 8–10 kHz |
| Compression | Snare: 2:1, slow attack; Overhead: often none |
If you want, I can sketch a quick mic placement diagram (photo or simple drawing) for your specific kit size and room—send a picture of the kit and the room and I’ll mark optimal positions based on what I see.